Building and Setting Up the Centax-2 and Centax-3 Clutches
- used with permission from author Glenn Cauley
- Linked to:
- Centax 3 clutch-set (excl. Flywheel)
Centax clutch setup in Serpent cars remains a bit of a mystery to many, especially when you have to deal with the different versions available (Centax-1, Centax-2, and now Centax-3) that all have different places that you use shims and spacers and the like. In this short series of articles, I hope to unveil some of the tips and tricks of setting up these great clutches.
This article deals with the assembly and setup of the Centax-2 and Centax-3 clutches.
You can find the article on the assembly and setup of the original Centax-1 clutch at:
http://www.mytsn.com/publ/publ.asp?pid=10532
Centax Clutch – A History Lesson
Serpent was the first to introduce the Centax clutch to nitro racing. The original Centax clutch is easily recognizable from other versions by its use of small internal bearings, small thrustbearing, and flyweights that were held together with a loop spring.
With the evolution of the Centax clutch to the 2nd and 3rd versions, Serpent has increased the durability and adjustability of the Centax clutch by doing the following:
* larger internal ball-bearings
* larger heavy-duty thrustbearing
* revised flyweight system
* easier shimming system (no flywheel removal required)
* screw-on pinions
The Centax-1 and Centax-2 share many of the same internal parts, including the following:
* flywheel & nut
* tension springs, cup, and adjustment cap
* rear shims and endplay shims
* clutchbell
* screw-on pinion gears
* clutch shoe & backing plate
Centax-2 and Centax-3 Clutches – Likenesses and Differences
The major difference between the Centax-2 and Centax-3 lies in the clutchbell and pinions. However, there are also minor internal differences such as use of different sizes of internal ball-bearings, different flyweights, and different clutch shoe.
There are many small differences between the Centax-2 and Centax-3 clutches; you CANNOT interchange the following parts between them:
* flywheel
* clutchbell
* pinion gears
* flyweights
* clutch shoe
Before you build and set up your Centax-2 or Centax-3 clutch, it is a good idea to invest in a set of digital vernier calipers. You can also use a Team Tamale Digital Clutch Gap and Endplay Tool that I describe in my article at:http://www.mytsn.com/publ/publ.asp?pid=10173
Centax-2 Clutch – Exploded View
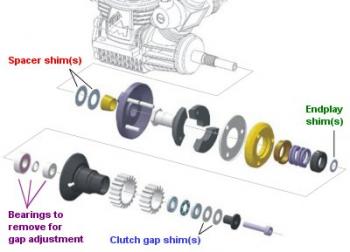
Here is an exploded view of the Centax-2 clutch, showing the various internal parts, and also indicating where the different adjustment shims are used.
Centax-3 Clutch – Exploded View
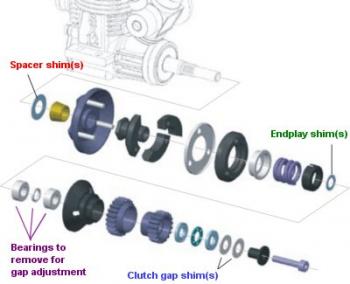
Here is an exploded view of the Centax-3 clutch, showing the various internal parts, and also indicating where the different adjustment shims are used.
Shimming the Centax-2 and Centax-3 Clutches
The Centax-2 and Centax-3 clutches use the same system for shimming the clutch gap and endplay. This system is much easier than the original Centax clutch in that you do not have to completely disassemble the clutch (including flywheel) to adjust the shimming for clutch gap.
Flywheel shim(s):
Typically, only a 0.5mm shim is placed on the crankshaft behind the flywheel to space the flywheel away from the engine bearing. If your car kit instructions say to use a different amount of spacers, obey the instructions. Do NOT use other shims here to adjust clutch gap or endplay – different shims are used for each of those applications.
Clutch gap shims:
Medium-size shims for clutch gap adjustment are placed on the thrustbearing sleeve in front of the thrustbearing. Shims should NOT be used anywhere else for this adjustment.
Endplay shims:
Small shims for endplay adjustment are placed on the crankshaft in front of the flywheel nut. Shims should NOT be used anywhere else for this adjustment.
Stage 1: Assembling the Centax-2 or Centax-3 Clutch
I strongly recommend following the Centax-2 or Centax-3 clutch instructions that came with the car. The information in this article is only meant tosupplement and clarify the original instructions.
Install the Centax-2 or Centax-3 clutch on the engine, with the engine NOT installed in the car (if possible). Assemble the clutch with all shims, bearings, etc. as described in the instructions.
Since you do not have to remove/reinstall the flywheel numerous times during the setup process (after assembly), you can set up the clutch with the engine in the car.
Typically, only a 0.5mm shim is placed on the crankshaft behind the flywheel to space the flywheel away from the engine bearing. If your car kit instructions say to use a different amount of spacers, obey the instructions. Do NOT use other shims here to adjust clutch gap or endplay – different shims are used for each of those applications.
Have a good selection of the medium-sized clutch gap shims available (fit on the thrustbearing sleeve), as well as the very small shims that are used for endplay adjustment.
Stage 2: Setting the Clutch Gap
Clutch gap is the first gap to set on the Centax-2 or Centax-3 clutch. This sets the distance that the clutch shoe moves before it contacts the clutchbell, which determines HOW the clutch engages. Clutch gap on the Centax-2 or Centax-3 clutch is adjusting be adding/removing shims ON THE THRUSTBEARING SLEEVE IN FRONT OF THE THRUSTBEARING – do not use shims anywhere else to adjust the clutch gap on this type of clutch.
Clutch gap can be set in the range of 0.5~0.7mm. I personally prefer a gap of 0.6mm.
Smaller clutch gap:
Smoother, less sudden clutch engagement. Better on a tight track or a slippery track.
Larger clutch gap:
Harder, more sudden clutch engagement. Better on a large track or a high-traction track.
Even though you have already assembled the clutch on the engine, you must now disassemble it partially in order to set the clutch gap.
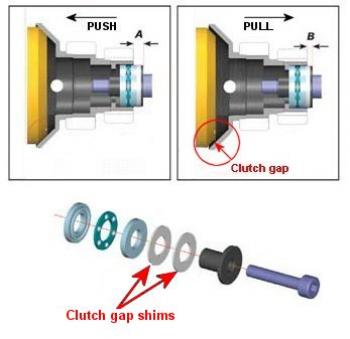
(The image here shows the cross-section of the Centax-2 clutch, but the theory behind clutch gap setup is the same for both Centax-2 and Centax-3 clutches.)
1. Remove the clutch end screw, and remove the clutchbell assembly: clutchbell, thrustbearing assembly, two internal ball-bearings and spacer.
2. Remove the two internal ball-bearings and spacer from inside the clutchbell.
3. Install the clutchbell onto the crankshaft using only the thrustbearing assembly. Tighten the end screw to make sure everything is secure.
4. Push the clutchbell against the clutch shoe.
5. Using digital calipers, measure the distance between the end of the thrustbearing sleeve and an edge on the clutchbell (perhaps the outside edge of the 1st gear pinion). This is distance “A.”
6. Pull the clutchbell away from the clutch shoe.
7. Using digital calipers, measure the new distance between the end of the thrustbearing sleeve and the same edge on the clutchbell. This is distance “B.”
8. Calculate the difference between A and B. This is your clutch gap.
Let’s assume you are setting the clutch gap to 0.6mm. If the current clutch gap is larger than 0.6mm, then you have to add the appropriate amount of shims ON THE THRUSTBEARING SLEEVE IN FRONT OF THE THRUSTBEARING to reduce the gap. Do NOT add shims anywhere else.
For example, if current gap is 1.0mm, you would add shims totalling 0.4mm thickness in front of the thrustbearing.
(1.0 – 0.6 desired gap = 0.4mm shims)
9. After you install the appropriate amount of shims, reassemble the clutch, but again do not install the two inner ball-bearings in the clutchbell.
10. Repeat steps 4-9 to verify that the clutch gap is at the desired value (for example, 0.6mm).
Stage 3: Setting the Endplay
Endplay is the last gap to set on the Centax-2 or Centax-3 clutch. Endplay is adjusted independently of clutch gap, and it is the amount that the clutchbell slides on the crankshaft with all internal bearings installed. You want to set the endplay so it is minimized; it is very bad for the clutch and will ruin a thrustbearing if the endplay is too great.
Endplay on the Centax-2 or Centax-3 clutch is adjusted by using very small shims ON THE CRANKSHAFT IN FRONT OF THE FLYWHEEL NUT (holding the flywheel onto the crankshaft). DO NOT use shims anywhere else to adjust the endplay on this type of clutch.
When completed, the clutchbell should spin freely and should NOT contact the clutch shoe.
1. Re-install the clutchbell using all the internal parts: two internal ball-bearings and spacer. Tighten the end screw securely.
2. Check to see if the clutchbell has axial play along the crankshaft. Chances are good there will be a fair bit of axial play. You want to have only a very small amount of endplay; just a barely noticeable hint of movement (0.10mm) is good, but don’t remove ALL endplay or the clutch will drag.
3. If you need to adjust the endplay, remove the complete clutchbell assembly (with bearings).
4. Add/remove the appropriate amount of the tiny shims ON THE CRANKSHAFT IN FRONT OF THE FLYWHEEL NUT. Do NOT use shims anywhere else.
You might have to add a lot of shims to reduce the endplay. As an example, on my Centax-3 in my Serpent 710, I had to add 0.75mm worth of those tiny shims!
5. Re-install the complete clutchbell assembly and recheck the endplay. Endplay should be minimal, with only a very slight amount of axial movement. The clutchbell should spin freely and not contact the clutch shoe.
Stage 4: Setting the Engagement Point
Setting the point at which the clutch engages is done exclusively by the tension on the preload spring. This must be set at the track with the car ready to race. Start by setting the preload according to the instructions, or maybe a little bit tighter.
I have found that the External Clutch Adjustment Tool offered by Team Tamale is a very good tool to adjust the engagement point of Centax clutches. For more information about this tool, see http://home.earthlink.net/~cbradshaw25/id5.html
Clutch engages too early:
The engine bogs and seems like it has no power. Tighten the spring preload collar to make the clutch engage later at higher RPM.
Clutch engages too late:
Engine must reach high RPM before the clutch engages. Loosen the spring preload collar to make the clutch engage earlier at lower RPM.
Periodic Maintenance
While the Centax-2 or Centax-3 clutches are remarkable pieces of engineering, they still requires periodic maintenance to ensure reliability and hassle-free performance. How often you maintain the clutch depends on how often and how hard you run the car, and the power of the engine.
* Regularly re-grease the thrustbearing with good grease (Mugen Super Grease is good).
* Clean and oil the ball-bearings… heavy bearing oil is recommended
* Clean any other parts as required.
* Periodically check the gaps to ensure all is well. After a time, the clutch shoe will wear down so the clutch gap may have to be changed.
* Periodically replace wearable parts (such as the clutch shoe), especially on more powerful engines
Conclusion
I hope that this article helps you to understand the assembly and setup of the Centax-2 or Centax-3 clutches a little bit better, and get the most out of them.
For further information, I have written several other articles on Serpent Centax clutches at:
http://www.mytsn.com/publ/publ.asp?pid=9829&ccid=9
http://www.mytsn.com/publ/publ.asp?pid=10063&ccid=9
As always, take great care when working with hand or power tools, soldering equipment, or heat sources. ALWAYS use proper eye and hand protection, and take all necessary precautions to avoid injury or damage.







Leave a Reply